LaravelとReactで作るSPAアプリ第5段です。
次はReactでスケジュールを新規に登録していきましょう。
Laravel×ReactでつくるSPAスケジュールアプリ【⑤新規登録】
登録の仕組みについておさらい
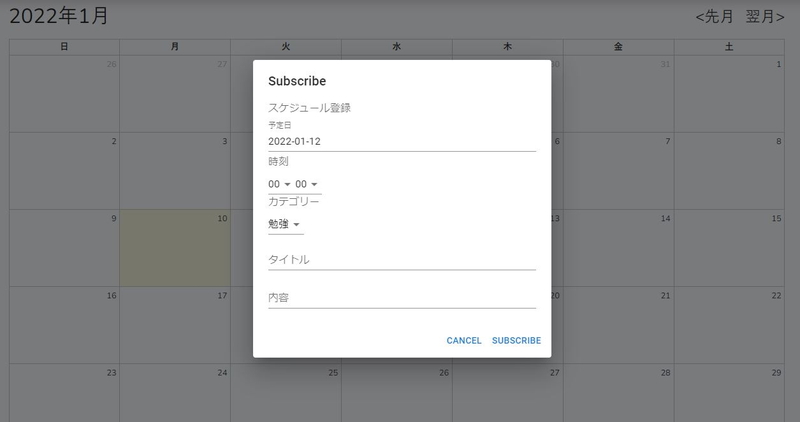
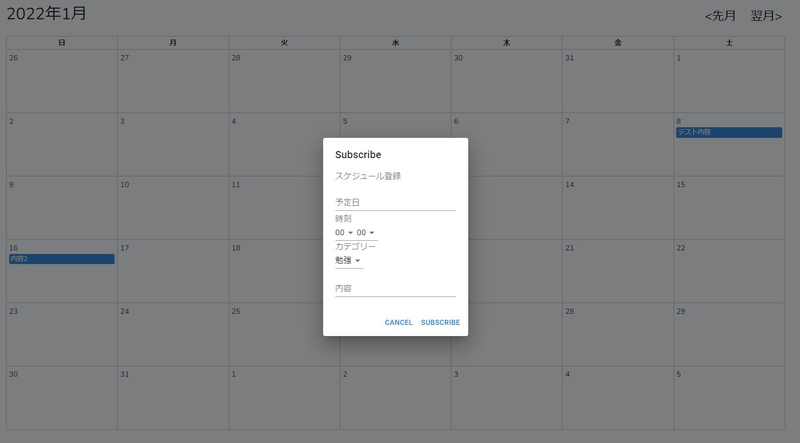
今回作成する登録画面の完成形は以下の通りです。
カレンダーをクリックするとポップアップで登録画面が出てくる感じです。
おしゃれで良いですね。さて、これを作る前に、アプリケーションの概要について説明しましょう。
前の記事の表示では割愛しましたが、ここで今一度確認です。
このアプリケーションはReactとLaravelで成り立っています。
それらを簡単に図解すると、以下のような形になります。
アプリケーションではブラウザ、コントローラー、データベースの3つに分けられます。
それぞれをReact、Laravelで繋いでいる形です。
そのため、作る場合にはまずはLaravelでコントローラーとデータベースが正しく連携しているか、
そして次にReactでコントローラーとブラウザの連携を確かめます。
まずはバックエンドとして、データベースとコントローラーの連携を行いましょう。
バックエンドを作ろう!
コントローラーを編集します。
以前の記事で「app/Http/Controllers/Api」配下に「ScheduleController.php」を作成しています。
ここに追記します。
ファイル名からも分かるように、これがコントローラーですね。
|
1 2 3 4 5 6 7 8 9 10 11 12 13 14 15 16 |
//スケジュールの取得 public function scheduleindex(Request $request){ $schedules = Schedule::all(); return response()->json($schedules); } //スケジュールの登録処理 public function create(Request $request){ $schedules = new Schedule; $schedules->sch_date = $request->sch_date; $schedules->sch_time = $request->sch_time; $schedules->sch_category = $request->sch_category; $schedules->sch_contents = $request->sch_contents; $schedules->save(); return response()->json($schedules); } |
その下に、登録処理を記載していきましょう。
スケジュールの各要素を指定して、save()で保存する簡単なものです。
登録情報を確認するために最後にJSON形式のReturnをしています。
コントローラーは作成したので、ルート情報を更新して、連携しましょう。
ルートファイルは「routes/api.php」です。
|
1 2 3 4 |
Route::group(['middleware'=>'api'],function(){ Route::post('posts','App\Http\Controllers\Api\ScheduleController@scheduleindex'); Route::post('posts/create','App\Http\Controllers\Api\ScheduleController@create'); //追加 }); |
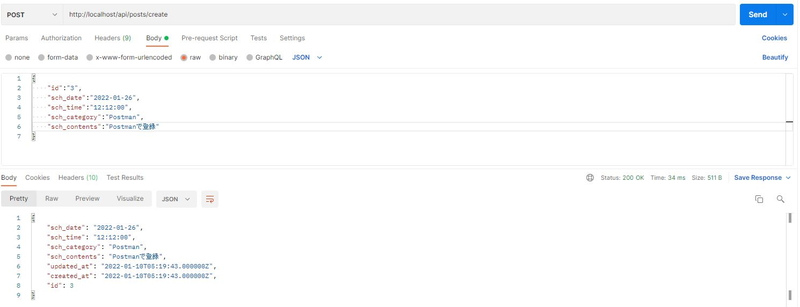
前の記事と同じく、Postmanで登録できるかどうか確認してみましょう。
設定は上の画像を参考にしてください。
「Body」「row」「JSON」を選ぶことを忘れずに。
とくに問題なければ画像の下のように、JSONが返ってきます。
データベースも念のために確認しておきましょう。
しっかりと登録できていますね。OKです。
この段階でSourceTreeでコミットしておいても良いかもしれませんね。
登録用のポップアップを実装する
次はフロントエンドです。コントローラーに接続できればデータは登録できることは確認しました。
連携するために、まずは登録用のポップアップを作成していきましょう。
ポップアップの作成には、Material UIを利用します。
Material UIでポップアップ機能を簡単に実装できるので、そちらを導入していきましょう。
Windows Power Shellに以下を入力して、Material UIを導入しましょう。
|
1 |
$ sail npm install @mui/material @emotion/react @emotion/styled |
これだけでインストールが完了します。
試しにMaterial UI Popoverを用いて、ダイアログを表示してみましょう。
Example.jsファイルを以下のように編集します。す。
|
1 2 3 4 |
import Dialog from '@mui/material/Dialog'; import DialogContent from '@mui/material/DialogContent'; import DialogContentText from '@mui/material/DialogContentText'; import DialogTitle from '@mui/material/DialogTitle'; |
Material UIのコンポーネントを使用するようにしています。
|
1 2 3 4 5 6 7 8 9 10 |
//登録用ポップアップ開閉処理 const[open,setOpen] = useState(false); const handleClickOpen = (e) =>{ setOpen(true); }; const handleClose = () =>{ setOpen(false); }; |
Material UIのPopoverに必要なopen、onClick、onCloseを定義しています。
Popoverに関しては詳細は説明しませんが、気になる方は公式リファレンスを参考にしてください。
最後にreturnの中身にダイアログの表示情報を記載すればOKです。
|
1 2 3 4 5 6 7 8 9 10 11 12 13 14 15 16 17 18 19 20 21 22 23 24 25 26 27 |
<td key={`${i}${j}`} id={day} onClick={handleClickOpen}> //onClickを追加 <div> <div> {day > last ? day - last : day <= 0 ? prevlast + day : day} </div> <div className="schedule-area"> {rows.map((schedule,k) => ( schedule.sch_date == year + '-' + zeroPadding(month) + '-' + zeroPadding(day) && <div className='schedule-title' key={k}>{schedule.sch_contents}</div> ))} </div> </div> </td> ))} </tr> ))} </tbody> </table> <Dialog onClose={handleClose} open={open}> //ダイアログの中身を追加 <DialogTitle>Subscribe</DialogTitle> <DialogContent> <DialogContentText> スケジュール登録 </DialogContentText> </DialogContent> </Dialog> |
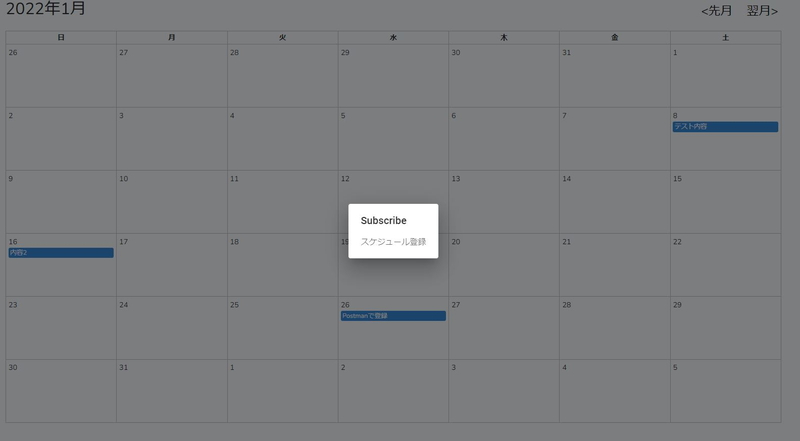
ビルドして確認をしてみてください。
スケジュールをクリックすると、ダイアログが表示されましたね!
登録用のポップアップを作成しよう!
ダイアログの表示は出来たので、次に登録用のフォームを作成しましょう。
Example.jsのダイアログの部分を追記していきます。
|
1 2 3 4 5 6 7 8 9 10 11 12 13 14 15 16 17 18 19 20 21 22 23 24 25 26 27 28 29 30 |
return ( <Dialog onClose={handleClose} open={open}> <DialogTitle>Subscribe</DialogTitle> <DialogContent> <DialogContentText> スケジュール登録 </DialogContentText> <TextField margin="dense" id="sch_date" name="sch_date" label="予定日" type="text" fullWidth variant="standard" value={data.sch_date}/> <InputLabel id="sch_time_label">時刻</InputLabel> <Select labelId="sch_hour" id="sch_hour_select" name="sch_hour" label="Hour" variant="standard" defaultValue="00"> <MenuItem value="00">00</MenuItem><MenuItem value="01">01</MenuItem> </Select> <Select labelId="sch_min" id="sch_min_select" name="sch_min" label="Min" variant="standard" defaultValue="00"> <MenuItem value=""></MenuItem> <MenuItem value="00">00</MenuItem><MenuItem value="01">01</MenuItem> </Select> <InputLabel id="sch_category_label">カテゴリー</InputLabel> <Select labelId="sch_category" id="sch_category_select" name="sch_category" label="Category" variant="standard" defaultValue="勉強"> <MenuItem value="勉強">勉強</MenuItem> <MenuItem value="案件">案件</MenuItem> <MenuItem value="テスト">テスト</MenuItem> </Select> <TextField margin="dense" id="sch_contents" name="sch_contents" label="内容" type="text" fullWidth variant="standard"/> </DialogContent> <DialogActions> <Button onClick={handleClose}>Cancel</Button> <Register formData={data} /> </DialogActions> </Dialog> ); |
|
1 2 3 4 5 6 7 8 9 10 11 12 13 |
import React,{Fragment,useState,useEffect} from 'react'; import ReactDOM from 'react-dom'; import axios from 'axios'; import Dialog from '@mui/material/Dialog'; import DialogActions from '@mui/material/DialogActions'; import DialogContent from '@mui/material/DialogContent'; import DialogContentText from '@mui/material/DialogContentText'; import DialogTitle from '@mui/material/DialogTitle'; import TextField from '@mui/material/TextField'; import Button from '@mui/material/Button'; import InputLabel from '@mui/material/InputLabel'; import MenuItem from '@mui/material/MenuItem'; import Select from '@mui/material/Select'; |
この状態でビルドを行うと、登録フォームのデザインが出来上がります。
ちなみにプルダウンの中身は簡略化のために「00」と「01」のみにしています。
時刻は23時まで、分数は60まで増やしておいてください。
(登録確認という意味ではこのままでも構いません)
デザインはできましたが、フォームとコントローラーを連動させていないので、データの登録はできません。
次のステップで連携を行っていきましょう。
登録フォームとコントローラーを連携する!
最後に連携作業をしましょう。
連携は事前にフォームのページに登録用配列を作成しておきます。
そしてフォームの値が変更されるたびに、その値を更新します。
フォームの登録ボタンが押されたときに、その配列をコントローラーに丸ごと投げる。
という実装になります。
Example.jsの関数をまとめてある部分に、配列とデータ変更時の関数を追加します。
|
1 2 3 4 5 6 7 8 9 10 11 12 13 |
//新規登録用データ配列 const [formData,setFormData] = useState({sch_category:'',sch_contents:'',sch_date:'',sch_hour:'',sch_min:''}); //入力値を一時保存 const inputChange = (e) =>{ const key = e.target.name; const value = e.target.value; formData[key] = value; let datas = Object.assign({},formData); setFormData(datas); console.log(formData); } |
setFormDataを用いて、フォームの値が変更されるたびに、値をセットするようにします。
フォームの部分も、当然変更します。
Exaple.jsのダイアログの部分を追記していきます。
|
1 2 3 4 5 6 7 8 9 10 11 12 13 14 15 16 17 18 19 20 21 22 23 24 25 26 27 28 29 30 |
return ( <Dialog onClose={handleClose} open={open}> <DialogTitle>Subscribe</DialogTitle> <DialogContent> <DialogContentText> スケジュール登録 </DialogContentText> <TextField margin="dense" id="sch_date" name="sch_date" label="予定日" type="text" fullWidth variant="standard" onChange={inputChange}/> <InputLabel id="sch_time_label">時刻</InputLabel> <Select labelId="sch_hour" id="sch_hour_select" name="sch_hour" label="Hour" variant="standard" defaultValue="00" onChange={inputChange}> <MenuItem value="00">00</MenuItem><MenuItem value="01">01</MenuItem> </Select> <Select labelId="sch_min" id="sch_min_select" name="sch_min" label="Min" variant="standard" defaultValue="00" onChange={inputChange}> <MenuItem value=""></MenuItem> <MenuItem value="00">00</MenuItem><MenuItem value="01">01</MenuItem> </Select> <InputLabel id="sch_category_label">カテゴリー</InputLabel> <Select labelId="sch_category" id="sch_category_select" name="sch_category" label="Category" variant="standard" defaultValue="勉強" onChange={inputChange}> <MenuItem value="勉強">勉強</MenuItem> <MenuItem value="案件">案件</MenuItem> <MenuItem value="テスト">テスト</MenuItem> </Select> <TextField margin="dense" id="sch_contents" name="sch_contents" label="内容" type="text" fullWidth variant="standard" onChange={inputChange}/> </DialogContent> <DialogActions> <Button onClick={handleClose}>Cancel</Button> <Register formData={data} /> </DialogActions> </Dialog> ); |
各種入力インプットに「onChange={inputChange}」を追加しています。
inputChangeは入力値の変更時に配列に値を登録するような関数になっています。
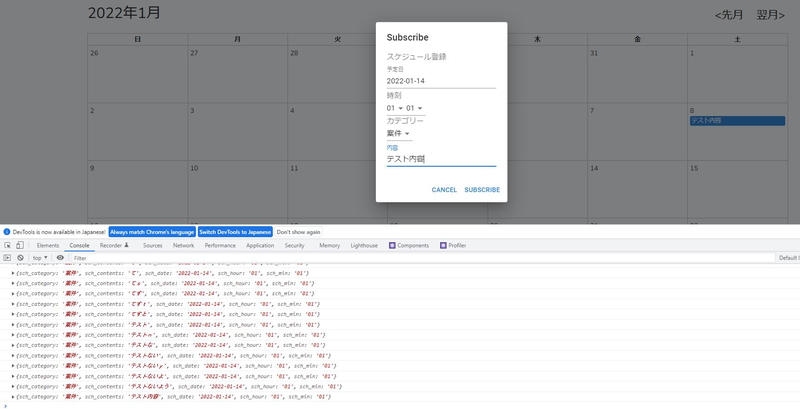
試しにビルドしてフォームにいろいろ入力しながらコンソールを確認してみると、入力値が反映されていることが確認できます。
色々と入力内容を弄ることで、配列にデータが登録されていることが分かります。
今のままではプルダウンは変更しないと影響を与えませんが、これも後程使いやすくしていきましょう。
さて、最後にコントローラーとの連携です。
URLを叩けばデータが登録されることは既に確認済みです。
前の記事でのデータ表示と同じく、anxiosで登録していきましょう。
|
1 2 3 4 5 6 7 8 9 10 11 12 13 14 15 16 17 18 19 20 21 22 23 24 25 26 |
//登録処理 const createSchedule = async(e) => { //リンク移動の無効化 e.preventDefault() //入力値を投げる await axios .post('/api/posts/create',{ sch_category:formData.sch_category, sch_contents:formData.sch_contents, sch_date:formData.sch_date, sch_time:formData.sch_hour + ':' + formData.sch_min }) .then((res)=>{ //戻り値をtodosにセット const tempPosts = post; tempPosts.push(res.data); setPosts(tempPosts) setFormData(''); }) .catch(error=>{ console.log(error); }) } --省略-- <Button href="/dashboard" onClick={createSchedule}>Subscribe</Button> //onClickを追加 |
関数部分に登録処理を追加します。
この関数をクリック時に呼び出すように、return内部のSubscribeボタンにonClickを追加しています。
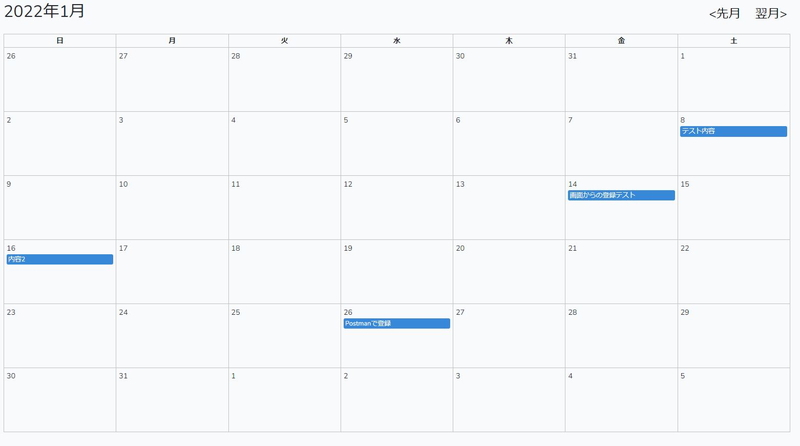
実際にいろいろ入力してみて、上記の画像のように登録出来ればOKです。
ここまで実装で来たら、SourceTreeでコミットしておきましょう。
細かい部分は後ほど修正するのが良いですね。
さて、今回はここまで。次はスケジュールの更新機能を実装していきましょう。
ここまでのExample.jsのソースを下の折り畳みの中に記載しておきますね。
- クリックでExample.jsの全ソース表示
-
123456789101112131415161718192021222324252627282930313233343536373839404142434445464748495051525354555657585960616263646566676869707172737475767778798081828384858687888990919293949596979899100101102103104105106107108109110111112113114115116117118119120121122123124125126127128129130131132133134135136137138139140141142143144145146147148149150151152153154155156157158159160161162163164165166167168169170171172173174175176177178179180181182183184185186187188189190191192193194195196197198199200201202import React,{Fragment,useState,useEffect} from 'react';import ReactDOM from 'react-dom';import axios from 'axios';import Dialog from '@mui/material/Dialog';import DialogActions from '@mui/material/DialogActions';import DialogContent from '@mui/material/DialogContent';import DialogContentText from '@mui/material/DialogContentText';import DialogTitle from '@mui/material/DialogTitle';import TextField from '@mui/material/TextField';import Button from '@mui/material/Button';import InputLabel from '@mui/material/InputLabel';import MenuItem from '@mui/material/MenuItem';import Select from '@mui/material/Select';function Example(){const [year,setYear] = useState(new Date().getFullYear())const [month,setMonth] = useState(new Date().getMonth()+1)const last = new Date(year,month,0).getDate()const prevlast = new Date(year,month-1,0).getDate()const calendar = createCalendear(year,month)const onClick = n => () => {const nextMonth = month + nif (12 < nextMonth) {setMonth(1)setYear(year + 1)} else if (nextMonth < 1) {setMonth(12)setYear(year - 1)} else {setMonth(nextMonth)}}//スケジュールのデータconst [schedules,setSche] = useState([])//画面読み込み時に、1度だけ起動useEffect(()=>{getPostData();},[])//バックエンドからデータ一覧を取得const getPostData = () =>{axios.post('/api/posts').then(response=>{setSche(response.data); //バックエンドからのデータをセットconsole.log(response.data);}).catch(()=>{console.log('通信に失敗しました');});}//データ格納の空配列を作成let rows = [];//スケジュールデータをrowに格納するschedules.map((post)=>rows.push({sch_id:post.id,sch_category:post.sch_category,sch_contents:post.sch_contents,sch_date:post.sch_date,sch_time:post.sch_time}));//登録用ポップアップ開閉処理const[open,setOpen] = useState(false);const handleClickOpen = (e) =>{setOpen(true);};const handleClose = () =>{setOpen(false);};//新規登録用データ配列const [formData,setFormData] = useState({sch_category:'',sch_contents:'',sch_date:'',sch_hour:'',sch_min:''});//入力値を一時保存const inputChange = (e) =>{const key = e.target.name;const value = e.target.value;formData[key] = value;let datas = Object.assign({},formData);setFormData(datas);console.log(formData);}//登録処理const createSchedule = async() => {//入力値を投げるawait axios.post('/api/posts/create',{sch_category:formData.sch_category,sch_contents:formData.sch_contents,sch_date:formData.sch_date,sch_time:formData.sch_hour + ':' + formData.sch_min}).then((res)=>{//戻り値をtodosにセットconst tempPosts = post;tempPosts.push(res.data);setPosts(tempPosts)setFormData('');}).catch(error=>{console.log(error);})}return (<Fragment><div className="calender-header"><h1>{`${year}年${month}月`}</h1><div className="calender-nav"><button onClick={onClick(-1)}>{'<先月'}</button><button onClick={onClick(1)}>{'翌月>'}</button></div></div><table className="calender-table"><thead><tr><th>日</th><th>月</th><th>火</th><th>水</th><th>木</th><th>金</th><th>土</th></tr></thead><tbody>{calendar.map((week,i) => (<tr key={week.join('')}>{week.map((day,j) => (<td key={`${i}${j}`} id={day} onClick={handleClickOpen}><div><div>{day > last ? day - last : day <= 0 ? prevlast + day : day}</div><div className="schedule-area">{rows.map((schedule,k) => (schedule.sch_date == year + '-' + zeroPadding(month) + '-' + zeroPadding(day) &&<div className='schedule-title' key={k}>{schedule.sch_contents}</div>))}</div></div></td>))}</tr>))}</tbody></table><Dialog onClose={handleClose} open={open}><DialogTitle>Subscribe</DialogTitle><DialogContent><DialogContentText>スケジュール登録</DialogContentText><TextField margin="dense" id="sch_date" name="sch_date" label="予定日" type="text" fullWidth variant="standard" onChange={inputChange}/><InputLabel id="sch_time_label">時刻</InputLabel><Select labelId="sch_hour" id="sch_hour_select" name="sch_hour" label="Hour" variant="standard" defaultValue="00" onChange={inputChange}><MenuItem value="00">00</MenuItem><MenuItem value="01">01</MenuItem></Select><Select labelId="sch_min" id="sch_min_select" name="sch_min" label="Min" variant="standard" defaultValue="00" onChange={inputChange}><MenuItem value="00">00</MenuItem><MenuItem value="01">01</MenuItem></Select><InputLabel id="sch_category_label">カテゴリー</InputLabel><Select labelId="sch_category" id="sch_category_select" name="sch_category" label="Category" variant="standard" defaultValue="勉強" onChange={inputChange}><MenuItem value="勉強">勉強</MenuItem><MenuItem value="案件">案件</MenuItem><MenuItem value="テスト">テスト</MenuItem></Select><TextField margin="dense" id="sch_contents" name="sch_contents" label="内容" type="text" fullWidth variant="standard" onChange={inputChange}/></DialogContent><DialogActions><Button onClick={handleClose}>Cancel</Button><Button href="/dashboard" onClick={createSchedule}>Subscribe</Button></DialogActions></Dialog></Fragment>);}function createCalendear(year,month){const first = new Date(year,month - 1,1).getDay()return [0,1,2,3,4,5].map((weekIndex) => {return [0,1,2,3,4,5,6].map((dayIndex) => {const day = dayIndex + 1 + weekIndex * 7return day - first})})}function zeroPadding(num){return ('0' + num).slice(-2);}export default Example;if (document.getElementById('app')) {ReactDOM.render(<Example />, document.getElementById('app'));}
| Laravel×Reactでつくるスケジュールアプリ | |
| 環境構築 | Git、Reactの導入 |
| カレンダー表示 | スケジュール表示 |
| スケジュール登録 | スケジュール更新 |
| スケジュール削除 | 関数化Ⅰ |
| 関数化Ⅱ | |

