LaravelとReactで作るSPAアプリ第6段です。
次にReactでスケジュールを更新しましょう。
Laravel×ReactでつくるSPAスケジュールアプリ【⑥更新】
まずはバックエンドから
前回までで、スケジュールの作成は完成しています。
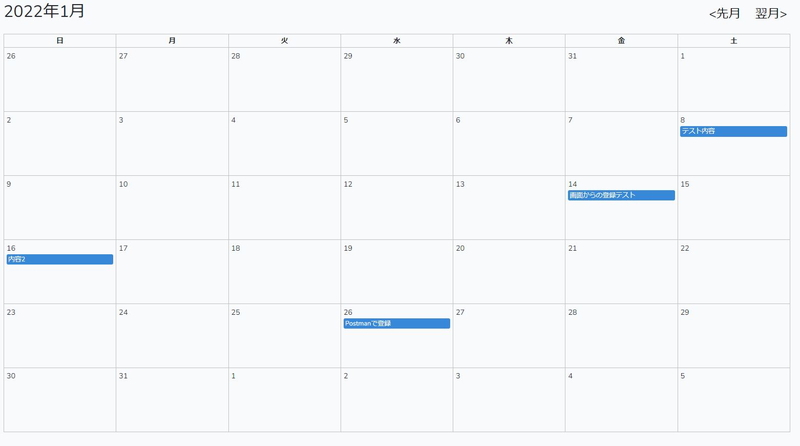
今回はスケジュールの青い部分をクリックすると新規登録と同じポップアップが発生し、
内容の更新ができる機能を実装していきましょう。
まずはバックエンドからです。
|
1 2 3 4 5 6 7 8 9 10 11 12 13 14 15 16 |
//更新画面への遷移 public function edit(Request $request){ $schedules = Schedule::find($request->id); return $schedules; } //データ更新アクション public function update(Request $request){ $schedules = Schedule::find($request->id); $schedules->sch_date = $request->sch_date; $schedules->sch_time = $request->sch_time; $schedules->sch_category = $request->sch_category; $schedules->sch_contents = $request->sch_contents; $schedules->save(); return $schedules; } |
登録ポップアップへの遷移、および登録処理そのものですね。
登録処理とほとんど変わらない内容になります。
ルート情報も更新しましょう。
|
1 2 3 4 5 6 |
Route::group(['middleware'=>'api'],function(){ Route::post('posts','App\Http\Controllers\Api\ScheduleController@scheduleindex'); Route::post('posts/create','App\Http\Controllers\Api\ScheduleController@create'); Route::post('edit','App\Http\Controllers\Api\ScheduleController@edit'); //追記 Route::post('update','App\Http\Controllers\Api\ScheduleController@update'); //追記 }); |
バックエンドの処理は完了です。
次に更新用ポップアップを作成しましょう。
これも登録用のポップアップを使いまわして作成します。
更新用のポップアップを実装する
次はフロントエンドです。更新用のポップアップを作成します。
Example.jsファイルを以下のように編集します。
|
1 2 3 4 5 6 7 8 9 10 11 12 |
//更新用ダイアログ開閉機能 const[editopen,setEditOpen] = useState(false); const editHandleClickOpen = (e) =>{ e.stopPropagation(); setEditOpen(true); getEditData(e); }; const editHandleClose = () =>{ setEditOpen(false); }; |
次にreturnの中身にクリック時にダイアログを開く処理を記載します。
|
1 2 3 4 5 6 |
<div className="schedule-area"> {rows.map((schedule,k) => ( schedule.sch_date == year + '-' + zeroPadding(month) + '-' + zeroPadding(day) && <div className='schedule-title' key={k} onClick={editHandleClickOpen}>{schedule.sch_contents}</div> //onClickを追加 ))} </div> |
|
1 2 3 4 5 6 7 8 9 10 11 12 13 14 15 16 17 18 19 20 21 22 23 24 25 26 27 |
<Dialog onClose={handleClose} open={editopen}> <DialogTitle>Subscribe</DialogTitle> <DialogContent> <DialogContentText> スケジュール更新 </DialogContentText> <TextField margin="dense" id="sch_date" name="sch_date" label="予定日" type="text" fullWidth variant="standard"/> <InputLabel id="sch_time_label">時刻</InputLabel> <Select labelId="sch_hour" id="sch_hour_select" name="sch_hour" label="Hour" variant="standard"> <MenuItem value="00">00</MenuItem><MenuItem value="01">01</MenuItem> </Select> <Select labelId="sch_min" id="sch_min_select" name="sch_min" label="Min" variant="standard"> <MenuItem value="00">00</MenuItem><MenuItem value="01">01</MenuItem> </Select> <InputLabel id="sch_category">カテゴリー</InputLabel> <Select labelId="sch_category" id="sch_category_select" name="sch_category" label="Category" variant="standard"> <MenuItem value="勉強">勉強</MenuItem> <MenuItem value="案件">案件</MenuItem> <MenuItem value="テスト">テスト</MenuItem> </Select> <TextField margin="dense" id="sch_contents" name="sch_contents" label="内容" type="text" fullWidth variant="standard"/> </DialogContent> <DialogActions> <Button onClick={handleClose}>Cancel</Button> <Button href="/dashboard">Subscribe</Button> </DialogActions> </Dialog> |
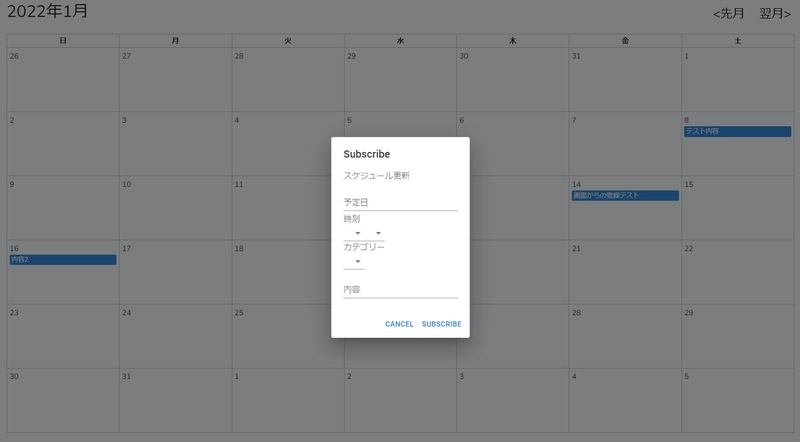
さて、ビルドをして更新フォームの確認をしましょう。
「スケジュール更新」という文字が確認できます。
データは連携していないので、取得はしていません。
次のステップで、データの取得や更新をしていきましょう。
更新用データを取得しよう!
データを取得してダイアログにデータを表示しましょう。
Example.jsの関数をまとめてある部分に、配列とデータ取得の関数を追加します。
|
1 2 3 4 5 6 7 8 9 10 11 12 13 14 15 16 17 18 19 20 21 22 23 |
//更新用のデータ配列 const [editData,setEditData] = useState({id:'',sch_category:'',sch_contents:'',sch_date:'',sch_hour:'',sch_min:''}); //バックエンドからデータ一覧を取得 function getEditData(e){ axios .post('/api/edit', { id: e.currentTarget.id }) .then(res => { setEditData({ id:res.data.id, sch_category:res.data.sch_category, sch_contents:res.data.sch_contents, sch_date:res.data.sch_date, sch_hour:res.data.sch_time.substr(0,2), sch_min:res.data.sch_time.substr(3,2) }); }) .catch(() => { console.log('通信に失敗しました'); }); } |
editDataに取得したデータを格納しています。
このデータを、ダイアログ内部で取得するようにします。
|
1 2 3 4 5 6 7 8 9 10 11 12 13 14 15 16 17 18 19 20 |
<DialogContent> <DialogContentText> スケジュール更新 </DialogContentText> <TextField margin="dense" id="sch_date" name="sch_date" label="予定日" type="text" fullWidth variant="standard" value={editData.sch_date}/> <InputLabel id="sch_time_label">時刻</InputLabel> <Select labelId="sch_hour" id="sch_hour_select" name="sch_hour" label="Hour" variant="standard" value={editData.sch_hour}> <MenuItem value="00">00</MenuItem><MenuItem value="01">01</MenuItem> </Select> <Select labelId="sch_min" id="sch_min_select" name="sch_min" label="Min" variant="standard" value={editData.sch_min}> <MenuItem value="00">00</MenuItem><MenuItem value="01">01</MenuItem> </Select> <InputLabel id="sch_category">カテゴリー</InputLabel> <Select labelId="sch_category" id="sch_category_select" name="sch_category" label="Category" variant="standard" value={editData.sch_category}> <MenuItem value="勉強">勉強</MenuItem> <MenuItem value="案件">案件</MenuItem> <MenuItem value="テスト">テスト</MenuItem> </Select> <TextField margin="dense" id="sch_contents" name="sch_contents" label="内容" type="text" fullWidth variant="standard" value={editData.sch_contents}/> </DialogContent> |
各種入力インプットに「value={editData.項目名}」を追加しています。
入っている内容をデータから適用させてあげるだけで、表示がされます。
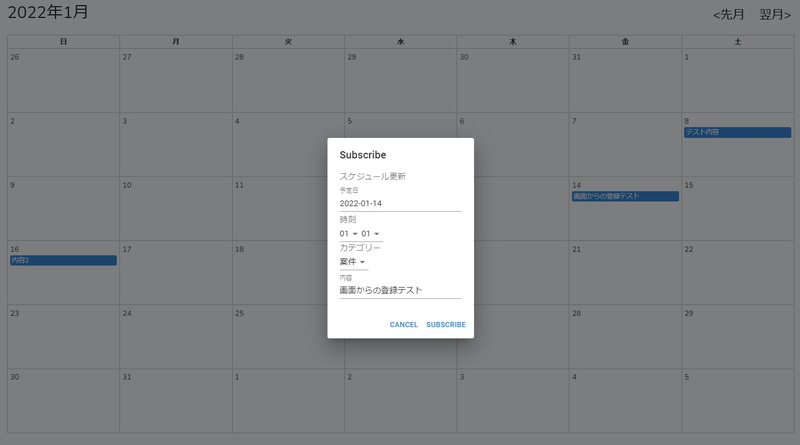
試しにビルドして、前の記事で登録したスケジュールをクリックしてみましょう。
データが取得できましたね。
これであとはダイアログの中身を変更して、更新をするだけです。
データを更新しよう!
最後に更新作業をしておしまいです。
Example.jsに更新処理を追記します。
|
1 2 3 4 5 6 7 8 9 10 11 12 13 14 15 16 17 18 19 20 21 22 23 24 25 26 27 28 29 30 31 32 33 34 35 36 37 38 39 40 41 42 43 44 45 46 47 48 49 50 51 52 53 54 55 56 |
//入力値を一時保存 const editChange = (e) =>{ const key = e.target.name; const value = e.target.value; editData[key] = value; let datas = Object.assign({},editData); setEditData(datas); } //ダイアログデータを登録 const updateSchedule = async(e) => { //リンク移動の無効化 e.preventDefault() //入力値を投げる await axios .post('/api/update',{ id:editData.id, sch_category:editData.sch_category, sch_contents:editData.sch_contents, sch_date:editData.sch_date, sch_time:editData.sch_hour + ':' + editData.sch_min }) .then((res)=>{ //戻り値をtodosにセット setEditData(res.data); }) .catch(error=>{ console.log(error); }) } --省略-- <DialogContent> <DialogContentText> スケジュール更新 </DialogContentText> <TextField margin="dense" id="sch_date" name="sch_date" label="予定日" type="text" fullWidth variant="standard" value={editData.sch_date} onChange={editChange}/> //onChangeを追加 <InputLabel id="sch_time_label">時刻</InputLabel> <Select labelId="sch_hour" id="sch_hour_select" name="sch_hour" label="Hour" variant="standard" value={editData.sch_hour} onChange={editChange}> //onChangeを追加 <MenuItem value="00">00</MenuItem><MenuItem value="01">01</MenuItem> </Select> <Select labelId="sch_min" id="sch_min_select" name="sch_min" label="Min" variant="standard" value={editData.sch_min} onChange={editChange}> //onChangeを追加 <MenuItem value="00">00</MenuItem><MenuItem value="01">01</MenuItem> </Select> <InputLabel id="sch_category">カテゴリー</InputLabel> <Select labelId="sch_category" id="sch_category_select" name="sch_category" label="Category" variant="standard" value={editData.sch_category} onChange={editChange}> //onChangeを追加 <MenuItem value="勉強">勉強</MenuItem> <MenuItem value="案件">案件</MenuItem> <MenuItem value="テスト">テスト</MenuItem> </Select> <TextField margin="dense" id="sch_contents" name="sch_contents" label="内容" type="text" fullWidth variant="standard" value={editData.sch_contents} onChange={editChange}/> //onChangeを追加 </DialogContent> <DialogActions> <Button onClick={editHandleClose}>Cancel</Button> <Button href="/dashboard" onClick={updateSchedule}>Subscribe</Button> //onClickを追加 </DialogActions> |
登録処理とほぼ同じですね。入力値を保存し、そのデータでデータベースを更新します。
入力値を反映させるために、onChangeを追加します。
最後に更新ダイアログの登録ボタンにonClickを指定して完成です。
試しに登録したデータを更新してみましょう。
実際にいろいろ入力してみて、上記の画像のように最終的に「画面からの更新テスト」にできればOKです。
ここまで実装で来たら、SourceTreeでコミットしておきましょう。
さて、今回はここまでです。次はスケジュールの削除機能を実装していきましょう。
今回もここまでのExample.jsのソースを下の折り畳みの中に記載しておきますね。
- クリックでExample.jsの全ソース表示
-
123456789101112131415161718192021222324252627282930313233343536373839404142434445464748495051525354555657585960616263646566676869707172737475767778798081828384858687888990919293949596979899100101102103104105106107108109110111112113114115116117118119120121122123124125126127128129130131132133134135136137138139140141142143144145146147148149150151152153154155156157158159160161162163164165166167168169170171172173174175176177178179180181182183184185186187188189190191192193194195196197198199200201202203204205206207208209210211212213214215216217218219220221222223224225226227228229230231232233234235236237238239240241242243244245246247248249250251252253254255256257258259260261262263264265266267268269270271272273274275276277278279280281282283284285286287288289290291292293294295296297import React,{Fragment,useState,useEffect} from 'react';import ReactDOM from 'react-dom';import axios from 'axios';import Dialog from '@mui/material/Dialog';import DialogActions from '@mui/material/DialogActions';import DialogContent from '@mui/material/DialogContent';import DialogContentText from '@mui/material/DialogContentText';import DialogTitle from '@mui/material/DialogTitle';import TextField from '@mui/material/TextField';import Button from '@mui/material/Button';import InputLabel from '@mui/material/InputLabel';import MenuItem from '@mui/material/MenuItem';import Select from '@mui/material/Select';function Example(){const [year,setYear] = useState(new Date().getFullYear())const [month,setMonth] = useState(new Date().getMonth()+1)const last = new Date(year,month,0).getDate()const prevlast = new Date(year,month-1,0).getDate()const calendar = createCalendear(year,month)const onClick = n => () => {const nextMonth = month + nif (12 < nextMonth) {setMonth(1)setYear(year + 1)} else if (nextMonth < 1) {setMonth(12)setYear(year - 1)} else {setMonth(nextMonth)}}//スケジュールのデータconst [schedules,setSche] = useState([])//画面読み込み時に、1度だけ起動useEffect(()=>{getPostData();},[])//バックエンドからデータ一覧を取得const getPostData = () =>{axios.post('/api/posts').then(response=>{setSche(response.data); //バックエンドからのデータをセットconsole.log(response.data);}).catch(()=>{console.log('通信に失敗しました');});}//データ格納の空配列を作成let rows = [];//スケジュールデータをrowに格納するschedules.map((post)=>rows.push({sch_id:post.id,sch_category:post.sch_category,sch_contents:post.sch_contents,sch_date:post.sch_date,sch_time:post.sch_time}));//登録用ポップアップ開閉処理const[open,setOpen] = useState(false);const handleClickOpen = (e) =>{setOpen(true);};const handleClose = () =>{setOpen(false);};//新規登録用データ配列const [formData,setFormData] = useState({sch_category:'',sch_contents:'',sch_date:'',sch_hour:'',sch_min:''});//入力値を一時保存const inputChange = (e) =>{const key = e.target.name;const value = e.target.value;formData[key] = value;let datas = Object.assign({},formData);setFormData(datas);}//登録処理const createSchedule = async() => {//入力値を投げるawait axios.post('/api/posts/create',{sch_category:formData.sch_category,sch_contents:formData.sch_contents,sch_date:formData.sch_date,sch_time:formData.sch_hour + ':' + formData.sch_min}).then((res)=>{//戻り値をtodosにセットconst tempPosts = post;tempPosts.push(res.data);setPosts(tempPosts)setFormData('');}).catch(error=>{console.log(error);})}//更新用ダイアログ開閉機能const[editopen,setEditOpen] = useState(false);const editHandleClickOpen = (e) =>{e.stopPropagation();setEditOpen(true);getEditData(e);};const editHandleClose = () =>{setEditOpen(false);};//更新用のデータ配列const [editData,setEditData] = useState({id:'',sch_category:'',sch_contents:'',sch_date:'',sch_hour:'',sch_min:''});//バックエンドからデータ一覧を取得function getEditData(e){axios.post('/api/edit', {id: e.currentTarget.id}).then(res => {setEditData({id:res.data.id,sch_category:res.data.sch_category,sch_contents:res.data.sch_contents,sch_date:res.data.sch_date,sch_hour:res.data.sch_time.substr(0,2),sch_min:res.data.sch_time.substr(3,2)});}).catch(() => {console.log('更新の通信に失敗しました');});}//入力値を一時保存const editChange = (e) =>{const key = e.target.name;const value = e.target.value;editData[key] = value;let datas = Object.assign({},editData);setEditData(datas);}//ダイアログデータを登録const updateSchedule = async() => {//入力値を投げるawait axios.post('/api/update',{id:editData.id,sch_category:editData.sch_category,sch_contents:editData.sch_contents,sch_date:editData.sch_date,sch_time:editData.sch_hour + ':' + editData.sch_min}).then((res)=>{//戻り値をtodosにセットsetEditData(res.data);}).catch(error=>{console.log(error);})}console.log(editData);return (<Fragment><div className="calender-header"><h1>{`${year}年${month}月`}</h1><div className="calender-nav"><button onClick={onClick(-1)}>{'<先月'}</button><button onClick={onClick(1)}>{'翌月>'}</button></div></div><table className="calender-table"><thead><tr><th>日</th><th>月</th><th>火</th><th>水</th><th>木</th><th>金</th><th>土</th></tr></thead><tbody>{calendar.map((week,i) => (<tr key={week.join('')}>{week.map((day,j) => (<td key={`${i}${j}`} id={day} onClick={handleClickOpen}><div><div>{day > last ? day - last : day <= 0 ? prevlast + day : day}</div><div className="schedule-area">{rows.map((schedule,k) => (schedule.sch_date == year + '-' + zeroPadding(month) + '-' + zeroPadding(day) &&<div className='schedule-title' key={k} onClick={editHandleClickOpen} id={schedule.sch_id}>{schedule.sch_contents}</div>))}</div></div></td>))}</tr>))}</tbody></table><Dialog onClose={handleClose} open={open}><DialogTitle>Subscribe</DialogTitle><DialogContent><DialogContentText>スケジュール登録</DialogContentText><TextField margin="dense" id="sch_date" name="sch_date" label="予定日" type="text" fullWidth variant="standard" onChange={inputChange}/><InputLabel id="sch_time_label">時刻</InputLabel><Select labelId="sch_hour" id="sch_hour_select" name="sch_hour" label="Hour" variant="standard" defaultValue="00" onChange={inputChange}><MenuItem value="00">00</MenuItem><MenuItem value="01">01</MenuItem></Select><Select labelId="sch_min" id="sch_min_select" name="sch_min" label="Min" variant="standard" defaultValue="00" onChange={inputChange}><MenuItem value="00">00</MenuItem><MenuItem value="01">01</MenuItem></Select><InputLabel id="sch_category_label">カテゴリー</InputLabel><Select labelId="sch_category" id="sch_category_select" name="sch_category" label="Category" variant="standard" defaultValue="勉強" onChange={inputChange}><MenuItem value="勉強">勉強</MenuItem><MenuItem value="案件">案件</MenuItem><MenuItem value="テスト">テスト</MenuItem></Select><TextField margin="dense" id="sch_contents" name="sch_contents" label="内容" type="text" fullWidth variant="standard" onChange={inputChange}/></DialogContent><DialogActions><Button onClick={handleClose}>Cancel</Button><Button href="/dashboard" onClick={createSchedule}>Subscribe</Button></DialogActions></Dialog><Dialog onClose={handleClose} open={editopen}><DialogTitle>Subscribe</DialogTitle><DialogContent><DialogContentText>スケジュール更新</DialogContentText><TextField margin="dense" id="sch_date" name="sch_date" label="予定日" type="text" fullWidth variant="standard" value={editData.sch_date} onChange={editChange}/><InputLabel id="sch_time_label">時刻</InputLabel><Select labelId="sch_hour" id="sch_hour_select" name="sch_hour" label="Hour" variant="standard" value={editData.sch_hour} onChange={editChange}><MenuItem value="00">00</MenuItem><MenuItem value="01">01</MenuItem></Select><Select labelId="sch_min" id="sch_min_select" name="sch_min" label="Min" variant="standard" value={editData.sch_min} onChange={editChange}><MenuItem value="00">00</MenuItem><MenuItem value="01">01</MenuItem></Select><InputLabel id="sch_category">カテゴリー</InputLabel><Select labelId="sch_category" id="sch_category_select" name="sch_category" label="Category" variant="standard" value={editData.sch_category} onChange={editChange}><MenuItem value="勉強">勉強</MenuItem><MenuItem value="案件">案件</MenuItem><MenuItem value="テスト">テスト</MenuItem></Select><TextField margin="dense" id="sch_contents" name="sch_contents" label="内容" type="text" fullWidth variant="standard" value={editData.sch_contents} onChange={editChange}/></DialogContent><DialogActions><Button onClick={editHandleClose}>Cancel</Button><Button href="/dashboard" onClick={updateSchedule}>Subscribe</Button></DialogActions></Dialog></Fragment>);}function createCalendear(year,month){const first = new Date(year,month - 1,1).getDay()return [0,1,2,3,4,5].map((weekIndex) => {return [0,1,2,3,4,5,6].map((dayIndex) => {const day = dayIndex + 1 + weekIndex * 7return day - first})})}function zeroPadding(num){return ('0' + num).slice(-2);}export default Example;if (document.getElementById('app')) {ReactDOM.render(<Example />, document.getElementById('app'));}
| Laravel×Reactでつくるスケジュールアプリ | |
| 環境構築 | Git、Reactの導入 |
| カレンダー表示 | スケジュール表示 |
| スケジュール登録 | スケジュール更新 |
| スケジュール削除 | 関数化Ⅰ |
| 関数化Ⅱ | |


